CI/CD with Jenkins
I use AWS Linux web server, Linux command Line, GitHub project where index.html page is created.
ATTENTION!!!! AWS is NOT free.
Steps:
- Create server
- Install Apache HTTP Server (need for examples)
- Install Java from 8 to 11 (need for Jenkins)
- Install Jenkins
- Install Git (needed for working with GitHub repo)
- Open permission to write data to server's folder
- Add plugin Publish Over SSH (need to push files to the server)
- Link created server with Jenkins
- Set up the first job that takes code from GutHub and pushes it to the server
CREATE SERVER
- Go to https://aws.amazon.com/
- Create an account and log in
- Type in a search field EC2 and open EC2 page
- Click "Launch instance" (instance == server) and you can just follow predifined settings, but activate a checkbox "Allow HTTP traffic from the internet", also you can set your storage size up to 30 Gib
- Click "Launch instance" = launch server
Open Linux console, go to the file with server's key and run command chmod 400 NAME_OF_FILE_WITH_SERVER_KEY.pem. Then connect to the server ssh -i "NAME_OF_FILE_WITH_SERVER_KEY.pem" ec2-user@YOUR_PUBLIC_DNS. Examples and the instruction how to connect to the server via SSH you can find if click on your instance in EC2 page and click "Connect".
INSTALL APACHE HTTP SERVER
Connect to the EC2 server via Linux console and install Apache server (below if I write about Linux console I mean this console, where you connected to the server) sudo yum install httpd. A new directory /car/www/html was created on the server. Later there will be your index.html page, but now it is empty.
Start the server via Linux console sudo service httpd start. I'm not sure for what this command is, but I did chkconfig on. Now you can put your server's IP in a browser ans see the welcome Test Page.
INSTALL JAVA
Jenkins works only with Java versions from 8 to 11. To install 11 version type in the Linux console sudo amazon-linux-extras install java-openjdk11. To check if it was installed and to know a number of the version, type in the console java -version and you will see openjdk version 11.
INSTALL JENKINS
Ensure that your software packages are up to date type to Linux console sudo yum update -y, then add the Jenkins repository sudo wget -O /etc/yum.repos.d/jenkins.repo \ https://pkg.jenkins.io/redhat-stable/jenkins.repo
Import a key file from Jenkins-CI to enable installation from the package sudo rpm --import https://pkg.jenkins.io/redhat-stable/jenkins.io.key and sudo yum upgrade
Install Jenkins sudo yum install jenkins -y and enable the Jenkins service to start at boot sudo systemctl enable jenkins
Start Jenkins sudo systemctl start jenkins and check the status sudo systemctl status jenkins, it should bu "running"
To open jenkins UI in a browser you have to open the port 8080 in your server:
- login to AWS
- go to you running instance (=server) and click on it
- below find "Security groups" and open settings
- edit "Inbound rules" -> and add a new row with the port 8080

After you did it you can open Jenkins UI in a browser http://SERVER_IP:8080. To log in you need an Administrator password, so type in the same Linux console sudo cat /var/lib/jenkins/secrets/initialAdminPassword, copy the password and log in.
Click "Install suggested plugins". After installation is completed you will see "Create first Admin User" window, so create login and password for Jenkins and log in.
INSTALL GIT
In Linux console type sudo yum install git -y. To check if Git was installed and it's version git version
OPEN PERMISSION TO WRITE DATA TO SERVER FOLDER(S)
Run this code in Linux console to be able to change data in a specified directory sudo chmod -R 777 /var/www
ADD PLUGIN "PUBLISH OOVER SSH"
This plugin is needed for sending files from Jenkins to the server via SSH.
- Click "Manage Jenkins"
- Find and click "Manage Plugins"
- Open "Available" tab and type there "Publish Over SSH"
- Install the plugin and restart Jenkins.
LINK YOUR SERVER TO JENKINS
- Click "Manage Jenkins"
- Find and click "Configure System"
- Find "Publish over SSH"
- In the field "Key" put you server's key that was created and automatically downloaded when you were creating server. Put not a file, but the key data itself

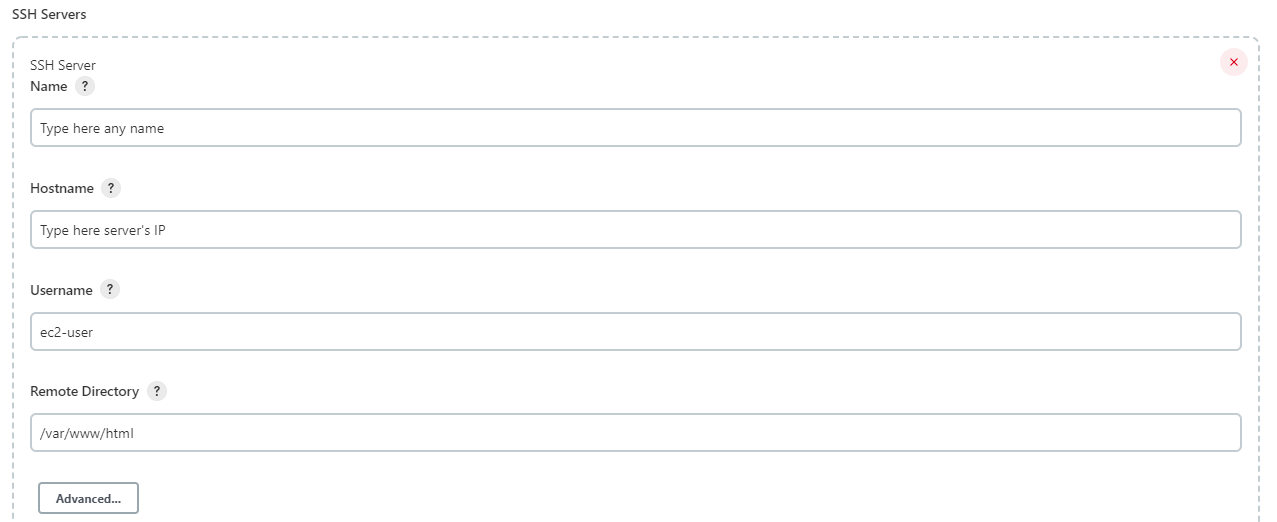
Below the "Key" field find "SSH Server" and click "Add". In the field "Name" type the name of your server, the name can be anything, it's needed only for setting up Jenkins. In the field "Hostname" type server's IP address. In the field "Username" add the username that specified on the server, usually it's ec2-user. In the field "Remote Directory" add path to the html folder on the server, the path is: /var/www/html

Click the button "Test configuration", you should see "Success".
SET UP THE FIRST JOB
You will need set up connection with GitHub via SSH. In short: Jenkins will connect to GitHub → clone the repository → build/compile/test this code (depends on settings) → deploy to the server.
First of all we need to create keys. Clone the GitHub repo to your PC and do git Bash in the folder with the project(I did it on Windows, think you can use Linux console), type in the console ssh-keygen. You will be asked how to name the file, for example the name is "jenkins". Then type Enter and Enter. Two keys were created: "jenkins" and "jenkins.pub". You can see their files by typing command ls in the same console.
To see the key itself type cat jenkins.pub This is the public key. Copy the key itself, not the file. Then add the key on GitHub:
- Open your GitHub
- Open general settings (click on the icon in the right upper angle
- Open "Settings"
- Select "SSH and GPG keys"
- Click "New SSH key"
- Add a name and paste the key you copied from the console earlier
Then see and copy the private key itself cat jenkins, you will need it later. (just copy, not to add to GitHub)
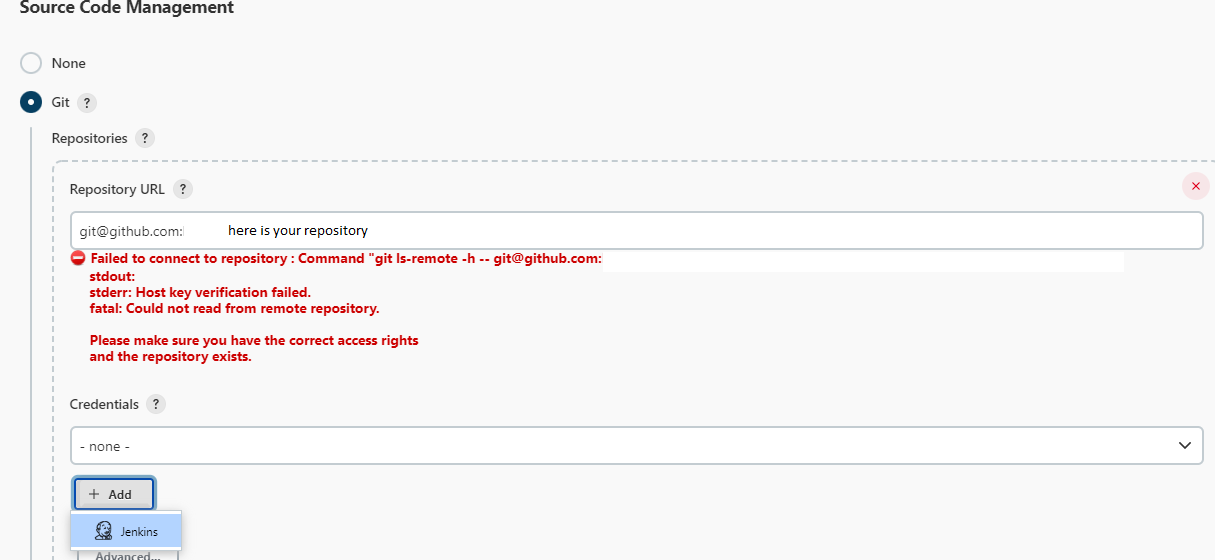
Go to Jenkins UI and create a new job with the type "Freestyle project". In job's settings find "Source Code Management" section. Activate "Git" radiobutton. In the field "Repository URL" put URL of your repository that you want to deploy to the server (it's the same URL we use for clonning the repository, but select "Clone" via SSH). As you add URL you will see an error because we didn't add the private key yet (if use https link - everithing will work without keys). To add the private key to the Jenkins repo click "+ Add" button and select "Jenkins".

In the opened window find "Kind" and select "SSH Username with private key". Username = your GitHub username (to get to know your user name type in git Bash console git config --list). Find "Private Key" and select "Enter directly", then past there the private key that was copied earlier. Add ID and Description so you can understand later for what connection this credential is. Click "Add" button to save all settings.
You will be automatically returned to the job's settings page and now in "Credentials" select newly created credential. The error under "Repository URL" will disappear.
Find "Post-build Actions" and click on it → select "Send build artifact over SSH" → select the server's name → in "Source files" type **/*. Run the job. Open your IP in a browser and you will see your site.
Add new Node and Slaves
- Click "Manage Jenkins"
- Find and click "Manage Nodes"
- Click "New Node"
- Add any name, activate a radiobutton "Permanent agent" and click "Create"
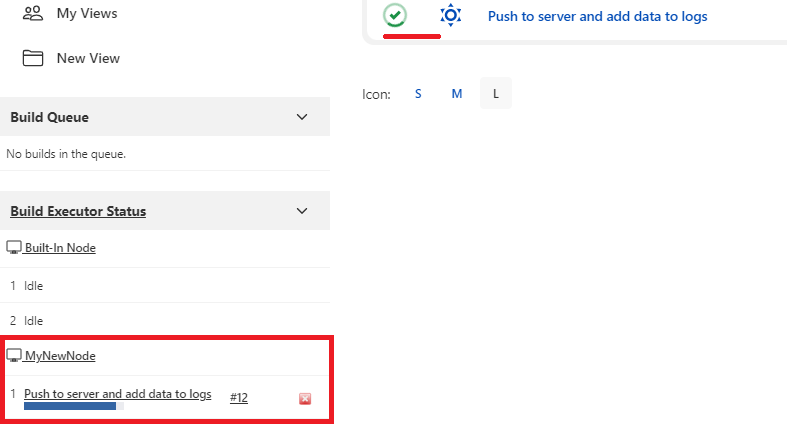
Fill the field "Remote root directory" this is the path where all node's files will be kept on server, can specify any folder or create a new one, don't forget to add permission to write files to this folder sudo chmod -R 777 /PATH_TO_FOLDER. Fill the field "Labels", you will use labels to select a partucular node to run jobs.
Find "Launch method" and select "Launch agent via SSH". Field "Host" = server's IP. Credentials → click "Add" → select Jenkins → Field "Kind" select "SSH Username with private key". Type "Username" from your server, usually it's ec2-user and "Private key" → "Enter directly" → past your server's key (not the file, but the key data itself). It's better to fill "ID" field and give a recognazible name of this credential.
In the drop-down list "Host Key Verification Strategy" select "Manually trusted key Verification Strategy" and save all settings. After saving the node will be automatically started and it's name will be added on the left sidebar of Jenkins.
To start a job on a particular node
Go to job's settings, activate the checkbox "Restrict where this project can be run" and start typing the label of the node you want to select. Select node from drop-down list and don't forget to delete white space after the label's name because it is added automatically. (to select some labels just add labels' names splitted by white spaces). Save settings.

Start job from URL or Linux console
Create token:
- In Jenkins UI open accoun't settings
- Find "API Token"
- Click "Add new Token" and set name
- Click "Generate" and copy the token
Create a new job with a type "Freestyle project". In job's settings find "Build Triggers" → activate the checkbox "Trigger builds remotely (e.g., from scripts)" → put your token to the field "Authentication Token". Construct URL as shown on Jenkins UI and put in to the browser. You will see nothing in browser, however if open Jenkins UI you will see that this job was started. Example: http://SERVER_IP:8080/job/NAME_OF_JOB/build?token=TOKEN_NUMBER.
To start the job from Linux console you need to specify login and password, don't show your password, generte a new token instead of it. Then to start job from Linux console type curl http://LOGIN_TO_JENKINS:NEW_TOKEN@SERVER_IP:8080/job/NAME_OF_JOB/build?token=TOKEN_NUMBER
Build periodically
For example Jenkins can check every 2 hours\days\weeks if there is a new code in a repository and if there is start the job. Create a new job with the type "Freestyle project", in job's settings find "Source Code Management" → add HTTPS link to GitHub repository. Find "Build Triggers" → activate the checkbox "Poll SCM" and set how often Jenkins should check the repository.
Build if there was a new push in a repository
In Jenkins
- Install the plugin "GitHub plugin"
- Create a new job with the type "Freestyle project"
- In job's settings find "GitHub project" and add HTTPS link to a GitHub repository.
- find "Source Code Management" and add the same link
- Find "Build Triggers" and activate the checkbox "GitHub hook trigger for GITScm polling"
In GitHub
- Open repository's settings
- Click "Webhooks" and add webhooks
- In the field "Payload URL" put http://SERVER_IP:8080/github-webhook/
- Select "Content type" json
- Specify "Which events would you like to trigger this webhook?" select "Just the push event"
- Click "Add"
Jenkins pipeline
Install the plugin "Pipeline"
Create a new job with the type "Pipeline" → in job's settings find "Pipeline" and add this script
  pipeline {
    agent any

    stages {
        stage('Build') {
            steps {
                echo 'Start Build'
                echo 'Test Build'
                echo 'Finish Build'
            }
        }
    }
    stages {
        stage('Test') {
            steps {
                echo 'Start Test'
                echo 'Test Test'
                echo 'Finish Test'
            }
        }
    }
    stages {
        stage('Deploy') {
            steps {
                echo 'Start Deploy'
                echo 'Test Deploy'
                echo 'Finish Deploy'
            }
        }
    }
}
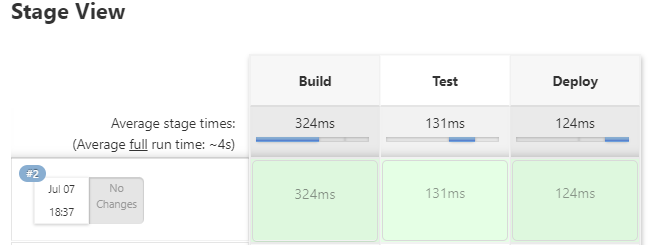
Run this job and you will see on UI information about each stage from the script. If you click on the stage you can see all logs connected to it.

Instead of typing all this script in Jenkins console it is possible automatically take a file with the script from GitHub:
- Create a job with Pypeline type
- In job's settings find "Pipeline"
- Select "Pipeline script from SCM"
- In "SCM" field select Git
- Specify an URL of a repository
Examples of Groovy commands
Click "Manage Jenkins" → click "Script Console" and type there commands. For example to change number of executors: Jenkins.instance.setNumExecutors(2)
Check all builds of a job and their results:
job = Jenkins.instance.getItemByFullName("DeployToTest")
job.getBuilds().each{
println("Build " + it + "result " + it.result)
}
Delete all jobs with specified result
job = Jenkins.instance.getItemByFullName("DeployToTest")
job.getBuilds().each{
  if(it.result == Result.FAILURE) {
  it.delete()
  }
}
Delete all job's builds and start the nex build from 1
job = Jenkins.instance.getItemByFullName("DeployToTest")
job.builds.each() { build ->
build.delete()
}

job.updateNextBuildNumber(1)
Summary:
1 – It's not possible to set up a webhook if you use Jenkins in localhost